Git Basics
[!IMPORTANT] This part of the tutorial is mostly about the concepts that you shall learn to work with Git effectively.
The Commit
Git keeps track on changes over a set of files that we mark as relevant to our projects. Whenever we perform a commit, Git registers the changes against a previous version of every file that is tracked.
When we add track of a file from our project for the first time, Git stores this version of the file. Every time we register a change of such file, Git identifies the differences between a previous version (not necessarily the previous one) of the file and the fresh one. That means, Git only registers those changes, not the entire file! This is really convenient because a continuous storage of each version for each file would end in heavy repositories, and a poor use of our storage backend. Every registered version of each tracked file can be recomposed using the initial version and the series of registered changes until the version you aim to recover, hence there is no real need to store an image of the entire file each time you perform a commit.
Then, what is a commit? We can define a commit as an entry in the history record of a project that generates a snapshot of the state of the project. When a file includes changes between the parent commit and the current status, Git stores only the changes to the file. When a file remains untouched, it simply points to the commit that includes for the first time the current state of the file. It also identifies the parent commit. This is very useful to reconstruct the full history tree of our project. So that's it (broadly speaking): a series of references to files and changes, and references to the parent commits (some special scenarios might produce two ancestor commits rather than only one).
Let's take a look at a project's history record:

We can identify the following key components:
- The commit's message: Usually a short sentence that describes the purpose of the changes.
- The commit's author: Every commit needs to identify the author of the changes (plus his/her email).
- A timestamp: This reference allows ordering the changes by time.
- A hash: How do we identify every commit unambiguously? Easy, a hash of the commit is used as identifier. Though we usually see a hash composed of 7 alpha-numeric characters, a commit hash includes 40 alpha-numeric characters. The main reason for that is to ease user's life. It's much easier to handle 7 characters rather than 40, and the chances that a collision would occur in your repository having 2 commits with the same 7 most significant characters are really low.
- A change list: Changes into existing files are detailed with the information regarding what lines have changed, what are added and what are deleted.
Besides those items, a commit might also include a full description of the purpose for the changes. However, this long message is optional, and not all the commits include it. It is advisable to include a longer description of the changes, since the commit's message doesn't allow to include much information in a single line message.
How to Group Changes Into a Commit
Despite this topic might seem silly at the beginning, you'll soon discover that is not a trivial subject how to group changes into commits. The most common way to use Git at the beginning is to perform commits every time we aim to freeze changes into the project's history. We usually add all the changes to the commit and we call it a day.
However, most of the programmers, sooner or later, find out that is not the best way to organise changes. Why? Because of a simple reason: we commit errors most of the time, and sooner or later we detect those errors and we try to fix them. If we identify a bug was introduced in a particular commit, we could simply erase that commit from the history, vanish those changes, and fix our bug. Sounds well, doesn't it? Now recap what we stated a paragraph ago: "We usually add all the changes to the commit". So erasing a commit would also mean wiping out other changes that are really useful. Ok, we sort of discover why the concept of atomicity is a key aspect on this subject.
There Is No Golden Rule
I'll tell you the bad news right away: there's no rule or set of rules that most developers blindly follow to perform well-structured commits. However, there are a few known rules that most developers agree everybody shall follow to avoid style-discussions with your project manager or maintainer or colleagues.
The main reason behind not having a standard procedure to add content to commits is the existence of many software development styles, and how those styles define atomic changes. While some styles encourage to commit quite often, others encourage to commit only when a particular feature is implemented by the set of changes that you'll include in the commit.
The best way to go would be to check what software development style is applied to the project you're part of, and ask if some style-guide is followed before attempting to do something by your own.
It is also important the context in which you're about to commit. It is not the same to commit into the main branch than into a personal branch that nobody else uses.
A Trade-Off Policy
To conclude this section a few rules are given that, regardless of the sw development style, or context, are advised to follow:
- Git is not a replacement for Dropbox, Google Drive or alike services. This means it is not advised to use Git to save content as we do with the previously mentioned services. Sometimes, you might end in the situation in which you need to save unfinished code to quickly share something or to run some integration tests, for example. Though I don't say never do this, I'd advise to keep this kind of usage to a bare minimum, and try to look for alternatives to cope with this situations.
- Avoid pushing code that doesn't work-compile to widely used branches such as main or devel. Regardless of how many people contribute to a project, it's common to consider the main branch as the one that holds the most most stable content in a project. Thus pushing unfinished or broken code into such kind of branch would provoke a headache to someone (or even you) in the future. Extended this policy to branches whose name is widely use in many project, such as devel, proposed_main or alike. Shared branches are used by many people as the basis to extend the existing code. Starting from a broken code is never an enjoyable experience.
- Avoid mixing logic areas in the same commit. If you are forced to include many changes into a single commit, at least, try to keep some logic coherency, and split changes into logical areas. For example, I find reasonable to split a feature's implementation and the related testing code into several commits. This way, if I find a bug in either the feature's code or the test, I would be able to touch only the affected part, leaving the other logic part untouched.
- Avoid verbosity in the commit's brief description whilst be verbose in the long description. Giving a short commit's message is not a bad thing as long as you provide more details in the long description. Also, avoid being redundant: the commit already says what was changed, thus provide a useful message that improves what is already said by those changes. Don't repeat the same message shown by the change list.
- Avoid binary content. As we have discussed, Git only records the changes between the previous stored versions of files and the new versions. This ends in a very efficient mechanism to keep track of changes. However, this is not always possible, in particular, Git can extract differences in binary files. That means every time you add to a commit a binary file, it is pushed into the project as it is. If you aim to push an updated version of the binary, the entire binary is pushed again, thus we end having the wight of both binaries. Repeat this process several times, and you'll end with a project that weights several hundreds of MB, or even a few GB (believe me, I suffered cloning repositories whose weight was a few GB, and it takes for ever). Sometimes, you really need to add some sort of binary content to your project, so I don't say it is forbidden. Just think twice whether you are pushing a binary that will evolve time to time or not. In the former scenario, you better opt for alternative ways to store and share such content. For example, GitHub Packages.
- Broadly speaking, don't add generated files. You should only add genuine content to the tracked files. Generated files should be easily reproducible using the genuine content of your project plus some guidelines. Sometimes, when the building process takes a considerable amount of time, people include final binaries. Remember, there exist better alternatives to Git to store and share such type of content.
Commit Flow
Reached this point there's only one missing topic to discuss about commits, what do I need to make one? Committing changes is a process about selecting what changes you aim to register, and what changes shall remain unregistered.
Status of a Project's Directory
Before we need to introduce how changes are categorized by Git. Consider the root directory of your project at a given moment in time. The first way to categorize files in your project is whether they are tracked by Git or not. Remember that Git stores changes only on tracked files. Eventually, you might introduce new files into your project. Git will tell you those files exist somewhere in your project's directory. Until you explicitly add an untracked file, it will stay there forever, appearing as a new file, thus changes that you might apply to such files are not really tracked.
You can configure Git to ignore certain type of files or complete paths in your project. This is really useful as it is really annoying to find tens or hundreds of untracked files when you have log files, or build directories. Find instructions to set up this feature in ???.
Add new files to track whenever you need it, it's not a big deal. Considering files that were tracked before, we get notified when Git detects that any of those include changes respect to the parent commit. If you aim to register a change, you have to promote it to the stage. The stage is the place where git collects all the changes that were marked as ready to be included in the next commit. Which means, whenever you make a commit all those staged changes get registered as the changes of the commit whilst changes that were out of the stage remain unregistered.
Briefly, Git stablish 3 categorizes (plus one): untracked files, modified files, and staged files. Moving files between those categories is the daily routine using Git. The extra category is a special one, which is not straightly related to a commit's flow, is called the stash. Consider this as a limbo for changes. Sometimes you need to preserve some unfinished changes, but you are not ready to commit them. Here is where the stash plays a key role. You can send all your changes (staged or not) there, and leave your project in a tidy status. After you do your stuff, you recover your changes from the stash and you continue your previous job. Read more details of the stash in the Advance chapter ??? .
Making a Commit
Once you've got a grasp on the different categories Git applies to files, making a commit is an easy job. You just ned to select what changes or new files shall be included into the commit, and when everything is ready, using some of the available tools, you make a new commit. Remember the rules mentioned before for the brief message and long message.
There's no rush to commit after you stage some change. In fact, you can change your mind and remove from the stage a change if you need to. Sometimes, you'll find that some of the changes of a file don't really match the scope of the commit you're about to make. For instance, you are about to fix a bug in your code, and by the way, you found a few typos in the docs. Should you group both changes into the same commit? Ideally you shouldn't. There are two clearly different scopes for your changes: fixing a bug and fixing a typo. If for some reason one of the proposed changes don't pass the filter of the review performed during a merge request process, you can simply take it out if you made a good scope splitting in your commits. If you didn't you'll have to manually take out some code changes, do another commit and push it to pass the review.
For that scenario, most tools offer the possibility of staging only parts of the file's changes rather than the entire set of changes at once. Check that out in the hands-on chapter!
Further Reading
- Pro Git, Chapter 2: Git Basics.
The Branch
A branch is, together with the commit, one of the most important features of Git. It allows to organise commits into several logic areas or contexts.
To clarify this definition, let's consider an example in which a project's development distinguish between two development contexts: stable code and development code. The former context identifies code that is ready for production; the latter code that is currently being developed, and might contain unfinished stuff and potential bugs. How do we tell easily to other people what part of the code is considered stable and what is not? Easy, using branches. We could define two branches: main and devel for this purpose. This way, whenever someone access our code, it is clearly stated that code within the branch main is considered stable, and within devel is not.
Git branches are pointers to commits of our project. Since our project already features a hierarchical structure thanks to commit's pointers to ancestors, branches don't need to do anything special, just point to the last commit that is included in the branch. We can track all the commits that belong to the branch just following these ancestor link of the commits until we reach a commit that is associated as the latest one of another branch.
This mechanism is pretty efficient, which means we shall no worry about having many branches as they are cheap! Use as many as you wish, but consider that the more branches you add, the more difficult your project will be to manage.
Branch Organisation
We already mentioned the main branch. You'll see that name quite often. Almost every project includes such name for the stable code. Old projects might include the branch master instead of main. Some years ago, the naming system suffered changes to avoid discriminatory words. So don't panic if you can't find the branch main in old projects! The word main and the associated branch has nothing special. We could have use the word favourite to name the principal branch of our project. This is up to you. However, you'll find that most developers follow the rule of naming main the principal branch of a project. This is a useful hint for external people to a project to easily identify stable code.
The term stable was always in italics, why? The rule of having only stable code that is ready to use by other people in the main branch is not a must. While some developers only include stable code that is ready to be released in the main branch, other developers don't distinguish at all any context in their projects, and include all the code (ready or not) within a single main branch.
The most common scenario when we aim to use the code from a project's repository is that we are offered the main branch in the repository's main page. Feel free to explore several repositories in GitHub. Above the file list of the repository, you'll find a dropdown menu with main preselected as the branch. Hence naming main the principal branch is not mandatory, it is advised to do so, as you'll provide very useful information to other developers when they reach your code.
Besides this rule, we can't identify many more advised rules that we should follow. As it happens with how to organise what content should be included in a single commit, the naming policy for the branches greatly depends on your sw development style.
One of the most used workflows is GitFlow. It differentiates several categories for the branches:
- main for stable released code.
- develop for the common development branch.
with feature as the name of the feature you're aiming to implement in such branch.
This workflow makes a very tidy categorisation of the code, but it also has cons as being harder to understand for beginners and heavy to maintain.
As final thought for this section, I'd advise you to always ask the maintainer of your project what naming schema you shall follow. If you're developing your own project, feel free to use whatever fits you best: if you aim to develop something quick with no hustle, push everything into the main branch. If you love to categorise things, go for some alike flow to GitFlow.
Fork and Merge
The most common operations that you'll do with branches are: fork and merge. The former refers to the process in which a new branch is created. You take a particular commit as the ancestor and you diverge a new branch from it. The latter is the opposite process: two branches that share a common ancestor, i.e. one was forked from the other, join their content into a single (merge) commit.
Forking a branch has no mystery at all: you select the commit that will be use as ancestor of the first commit of the new branch, and, whenever you perform the first commit of the new branch, the fork will be completed. Consider the following example taken from the book Pro Git:
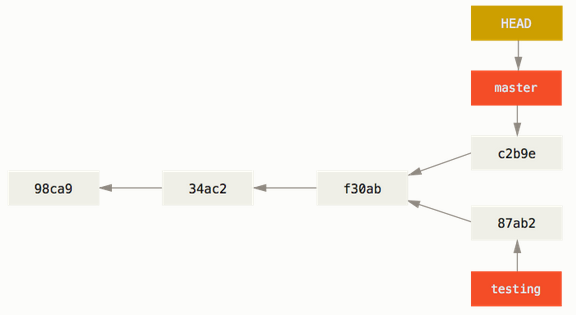
We can identify two branches there: master (there it goes an example of the old naming system) and testing. Both share a common ancestor: f30ab. From that commit downwards, we consider the rest of the commits to belong to the master branch because in our logic organisation of the project's context, master scores higher in the importance hierarchy of our branch naming system.
Sooner or later, you'll need to merge a branch into another. It is crucial to properly understand this mechanism. Imagine that in our former example, testing evolves adding several new commits that implement a new feature. When the new feature is considered as done, the most common use case would be to merge the content of the branch testing into the branch master. This way, the new feature will be exposed as stable.
When we attempt to merge content, Git evaluates the changes respect to the common ancestor for both the top of the branch master and testing. Sometimes the common ancestor is the target commit for the merge. This scenario is the easiest one, and it usually don't provoke issues in the merge. However, when both branches diverge from the common ancestor, Git has to perform a three-way merge. Quite often this scenario provokes conflicts: A piece of code in the ancestor was modified on both sides of the merge, what change should prevail? Git is really good at doing its job, but it can't read your mind (yet). Thus human intervention will be required to resolve the conflict.
Fork and merge will be in your daily routine: when you get assigned a new task, you, most likely, will fork an existing branch, do your job, and ... Merge, wasn't it? Maybe not. Performing a merge is usually a tricky task, that's why experience team mates usually get assigned this task. Forking is a relatively harmless thing, but consider that when you merge your changes into another branch, you can break pieces of code that others relay on. That's why unless you're working on your onw in a project, merges are usually requested. Somebody else gets assigned the task of reviewing your changes and approve the final merge. Even if you are working on your own, it is advisable to open merge requests rather than going straight for a manual merge to force you to read twice your changes, and double-check if your changes meet the chosen quality standards: tests are passing, code is documented,...
Besides these two operations, there exists other advance operations such as the rebase that you can apply to branches. However, these are more advanced techniques, i.e. a bad use ends in a pretty big disaster, so they are included in the advanced part of this tutorial.
Further Reading
- Pro Git, Chapter 3: Git Branching.